Create, read and modify a list, using a Loop determined by length of content
PRESENTATION
This tutorial is an introduction to the creation of loops and the use of Complex Types in Designer. You will be guided through the process of extracting the content of a list, using the Trigger Activity element. Then, you will learn how to modify the list, by adding or removing lines or modifying the content of the lines.
Prerequisites
- Have done the tutorial Start to use Sim4Sys with a simple model (blackbox),
- Concept on C++, in particular on the vector.
Skills that you will acquire
On Designer:
- use a Complex Data Type and some vector's operations from C++,
- model a Loop via the utilisation of Trigger Activities.
On Virtual Bench:
- define a mapping with a Complex Data Type as parameter.
Duration
2h30
CREATE THE MODEL
- Create a model called "LoopTest"
- Create a new project called "LoopProject"
- Create a service called "LoopV1"
- Create a life phase Standard use in "LoopV1"
Create a Complex Data Type
In the Type Diagram, add two New DataTypes:
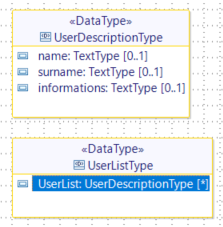
- UserDescriptionType: with the Attributes name, surname and information. All three have Type: TextType and Multiplicity: One
- UserListType: with the Attribute UserList. Type: UserDescriptionType and Multiplicity: Many
Create the Use Cases
In the Use Case Diagram, create:
- a New actor called "User",
- new use cases called "Inform about members" (where the content of the list is read and extracted during the loop) and "Modify the list"
Create the User Stories
In Modify the list, create four New User Stories: "the server receives the list", "the user adds a new member", "the user removes a member" and "the user modifies the information in the list".
In Inform about members, create three New User Stories: "the user requests information about members", "the server warns the member" and "the user has all information".
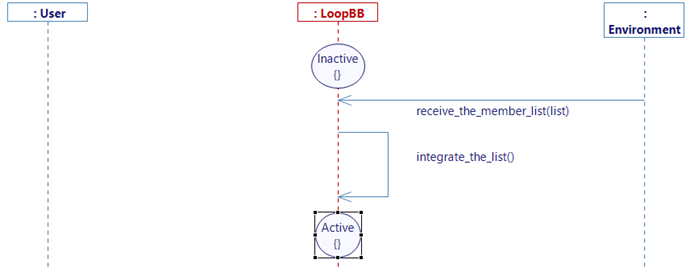
Complete "the server receives the list"
- Drag&Drop a New State. Select FirstState, click on OK and rename the state after creation (in Inactive),
- Drag&Drop a New State, Click on New State, drag&drop a New State (rename it "Active"), return to the server receives the list, and repeat, selecting "Active",
- Create the Variables: ListOfUsers (UserListType) and TotalNumberOfUsers (IntegerType, default value = 0),
- Create New Message from Environment to LoopBB, click on Create a new flow:
- Drag&Drop a New Interface: I_receive_the_member_list,
- Drag&Drop a New Flow in the Interface: receive_the_member_list (Data: list, UserListType),
- Create Internal Activity: "integrate_the_list"
- Right-click on the new Internal Activity, click on Edit and Edit Body then copy the following text:
ListOfUsers = receive_the_member_list_list;
TotalNumberOfUsers = ListOfUsers.UserList.size();
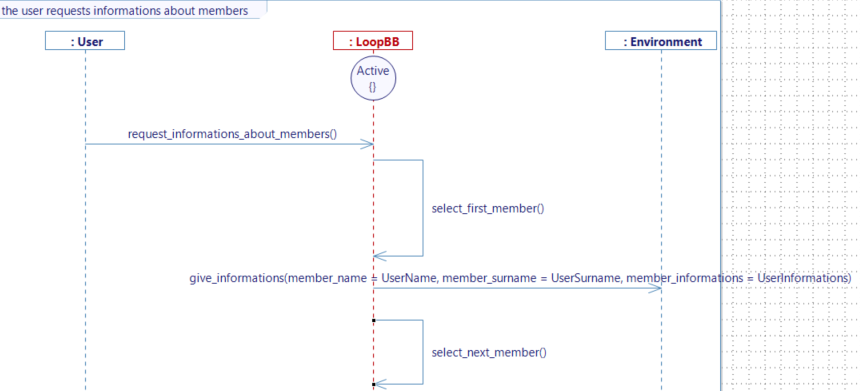
Complete "the user requests information about members"
This User Story is the initialization of the loop.
- Drag&Drop a New State, select "Active" and click on OK,
- Create a New Message from User to LoopBB:
- Interface: I_request_information_about_members,
- Flow: request_information_about_members,
- Create Internal Activity: "select_first_member"
- Right-click on the new Internal Activity, click on Edit and Edit Body then copy the following text:
// start of loop

UserName = ListOfUsers.UserList[0].name;
UserSurname = ListOfUsers.UserList[0].surname;
UserInformation = ListOfUsers.UserList[0].information;
- Create four New Variables: NumberOfMembersTreated (IntegerType, default value = 0), UserName, UserSurname and UserInformation (all three TextType),
- Create a New Message from Lifeline to Environment:
- Interface: I_give_information,
- Flow: give_information, add three Data, all TextType: member_name (Value: UserName), member_surname (Value: UserSurname) and member_information (Value: UserInformation),
- Create Internal Activity: "select_next_member"
- Right-click on the new Internal Activity, click on Edit and Edit Body then copy the following text:
// next iteration

NumberOfMembersTreated  = NumberOfMembersTreated  + 1;

if (NumberOfMembersTreated < TotalNumberOfUsers) //check that we are not off the list
{
	UserName = ListOfUsers.UserList[NumberOfMembersTreated].name;
	UserSurname = ListOfUsers.UserList[NumberOfMembersTreated].surname;
	UserInformation = ListOfUsers.UserList[NumberOfMembersTreated].information;
}
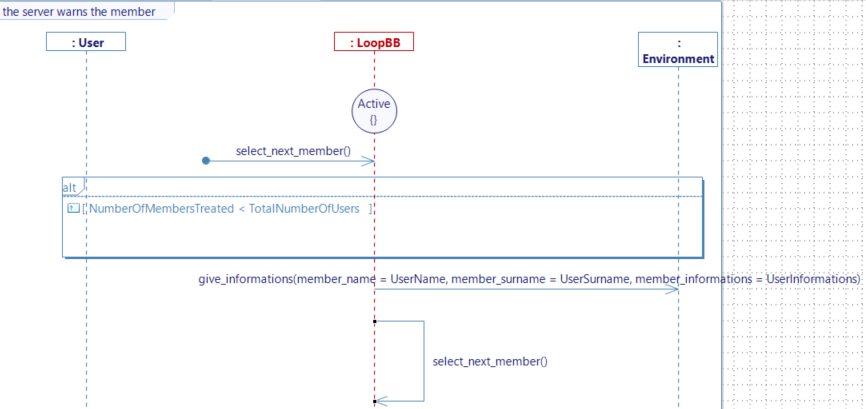
Complete "the server warns the member"
This User Story is the iterative part of the loop.
- Drag&Drop a New State, select "Active" and click on OK,
- Create a New Trigger Activity and select "select_next_member",
- Create a Guard Condition (Constraint: NumberOfMembersTreated is strictly less than TotalNumberOfUsers),
- Create a New Message from Lifeline to Environment, select give_information. The details are the same as for give_information in "the user requests information about members",
- Create a new Internal Activity, select "select_next_member".
Complete "the user has all information"
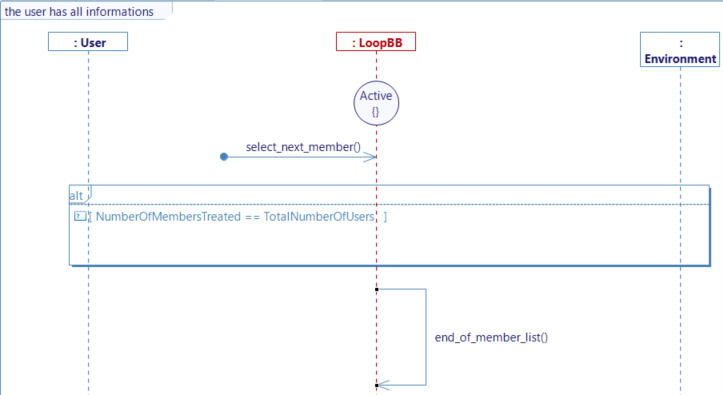
This User Story is the end part of the loop.
- Drag&Drop a New State, select "Active" and click on OK,
- Create a New Trigger Activity and select "select_next_member",
- Create a Guard Condition (Constraint: NumberOfMembersTreated is equal to TotalNumberOfUsers),
- Create a new Internal Activity, named "end_of_member_list"
- Right-click on the new Internal Activity, click on Edit and Edit Body then copy the following text:
// end of loop

NumberOfMembersTreated  = 0;
Complete "the user adds a new member"
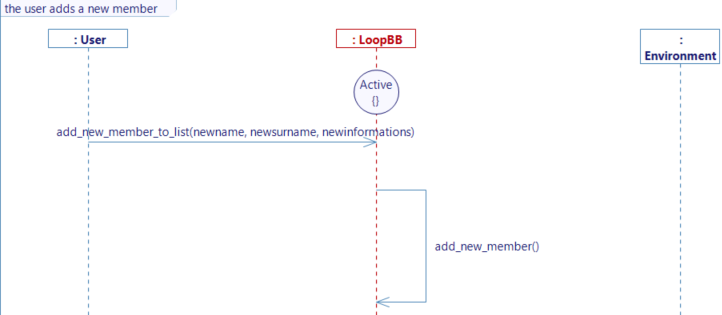
This User Story shows you how to add a new line in a vector.
- Drag&Drop a New State, select "Active" and click on OK,
- Create three New Variables TextType: NewName, NewSurname, NewInformation,
- Create a New Message from User to Lifeline:
- Interface: I_modify_the_list,
- Flow: add_new_member_to_list (three Data TextType: newname, newsurname, newinformation),
- Create Internal Activity: "add_new_member",
- Right-click on the new Internal Activity, click on Edit and Edit Body then copy the following text:
UserDescriptionType myNewLign; // define a temporary lign

myNewLign.name = add_new_member_to_list_newname ;
myNewLign.surname = add_new_member_to_list_newsurname ;
myNewLign.information = add_new_member_to_list_newinformation ;

ListOfUsers.UserList.push_back(myNewLign); // push the temporary lign
TotalNumberOfUsers = TotalNumberOfUsers + 1; // increase the list size
Complete "the user removes a member"
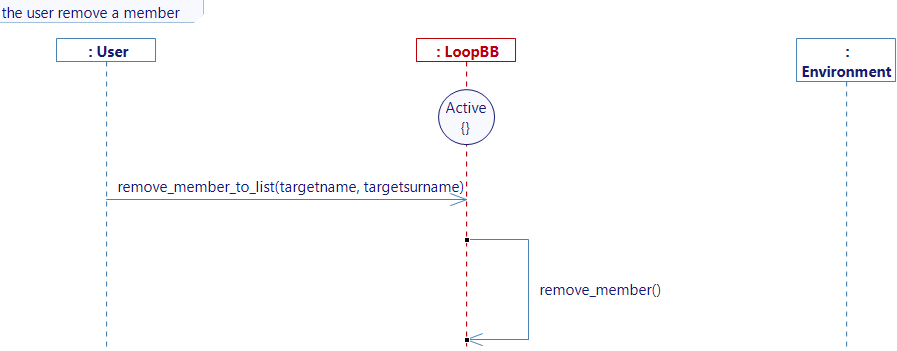
This User Story shows you how to remove a line in a vector.
- Drag&Drop a New State, select "Active" and click on OK,
- Create two New Variables TextType: TargetName and TargetSurname,
- Create a New Message from User to LoopBB:
- Reuse the interface: I_modify_the_list,
- Flow: remove_member_to_list (two Data TextType: targetname, targetsurname),
- Create Internal Activity: "remove_member",
- Right-click on the new Internal Activity, click on Edit and Edit Body then copy the following text:
TargetName = remove_member_to_list_targetname ;
TargetSurname = remove_member_to_list_targetsurname ;

if (ListOfUsers.UserList.size() > 0) //this line is to ensure the construction of the list
{
	for (int i=0; i<ListOfUsers.UserList.size(); i++)
 	{
		if (ListOfUsers.UserList[i].name == TargetName)
		{
			if (ListOfUsers.UserList[i].surname == TargetSurname)
			{
				ListOfUsers.UserList.erase(ListOfUsers.UserList.begin() + i);
				TotalNumberOfUsers = TotalNumberOfUsers - 1;
			}
		}
	}
}
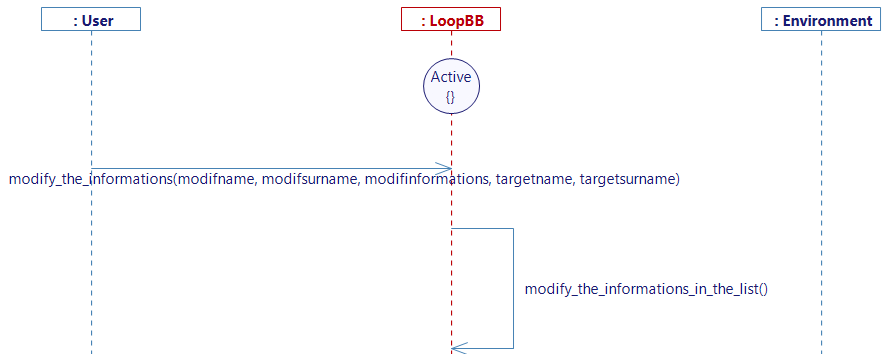
Complete "the user modifies the information in the list"
This User Story shows you how to modify the line content in a vector.
- Drag&Drop a New State, select "Active" and click on OK,
- Create three New Variables TextType: ModifName, ModifSurname and ModifInformation,
- Create a New Message from User to LoopBB:
- Reuse the interface: I_modify_the_list,
- Flow: modify_the_information (five Data TextType: modifname, modifsurname, modifinformation, targetname, targetsurname),
- Create Internal Activity: modify_the_information_in_the_list
- Right-click on the new Internal Activity, click on Edit and Edit Body then copy the following text:
TargetName = modify_the_information_targetname ;
TargetSurname = modify_the_information_targetsurname ;
ModifName = modify_the_information_modifname ;
ModifSurname = modify_the_information_modifsurname ;
ModifInformation = modify_the_information_modifinformation ;

UserDescriptionType ModifLign;

ModifLign.name = ModifName ;
ModifLign.surname = ModifSurname ;
ModifLign.information = ModifInformation ;

if (ListOfUsers.UserList.size() > 0) //this line is to ensure the construction of the list
{
	for (int i=0; i<ListOfUsers.UserList.size(); i++)
 	{
		if (ListOfUsers.UserList[i].name == TargetName)
		{
			if (ListOfUsers.UserList[i].surname == TargetSurname)
			{
				ListOfUsers.UserList[i].name = ModifName;
				ListOfUsers.UserList[i].surname = ModifSurname;
				ListOfUsers.UserList[i].information = ModifInformation;
			}
		}
	}
}
Generate State Machine
If you have the community version of Designer (free version), please build the executable via Hub4Sys as shown on this page, else (pro version) continue this section of the tutorial.
Once this is done, return to each user story, right-click on the diagram and select Edit > Generate State Machine. Once it is done for every user story, click on the button Generate and build.
Once the Model is finished with no errors, click on your Project then on Export File XML.
SIMULATION MAPPING
-
Go on the Sim4Sys Virtual Bench: https://sim4sys.com/.
-
Create a new scenario, executable and websocket (if needed, you can follow the detailed steps from the Mapping part of Start to use Sim4Sys with a simple model (blackbox), to create a new scenario).
-
Update the XML file for the executable that you will use (see this paragraph)
For the simulation we will need three scenario context:
- HMI (HMI context),
- timeline (Timeline context).
Then, add a new scenario, and double-click on its name to open it.
In your scenario tab, add a new WebSocket.
Select the executable you’ve created before, you can name the new Websocket as you want, and press Ok.
Mapping for the flows
Timeline context
Now let’s map the flow "introduce_the_list". To do that, see the following steps:
In Edit mode, select the timeline context and drag&drop a Timeline background element, then a timeAxis and four TimelineAction timeline, separated by at least two seconds each.
Click on the first TimelineAction timeline, change the parameter Start time to 0 and the Event type to Trigger.
For the second, do the same but put the Start Time at 5s.
Open the Mapping tab of the first TimelineAction timeline and add a simu to model mapping element for the flow "receive_the_member_list".
Click on the button Save. Repeat last action.
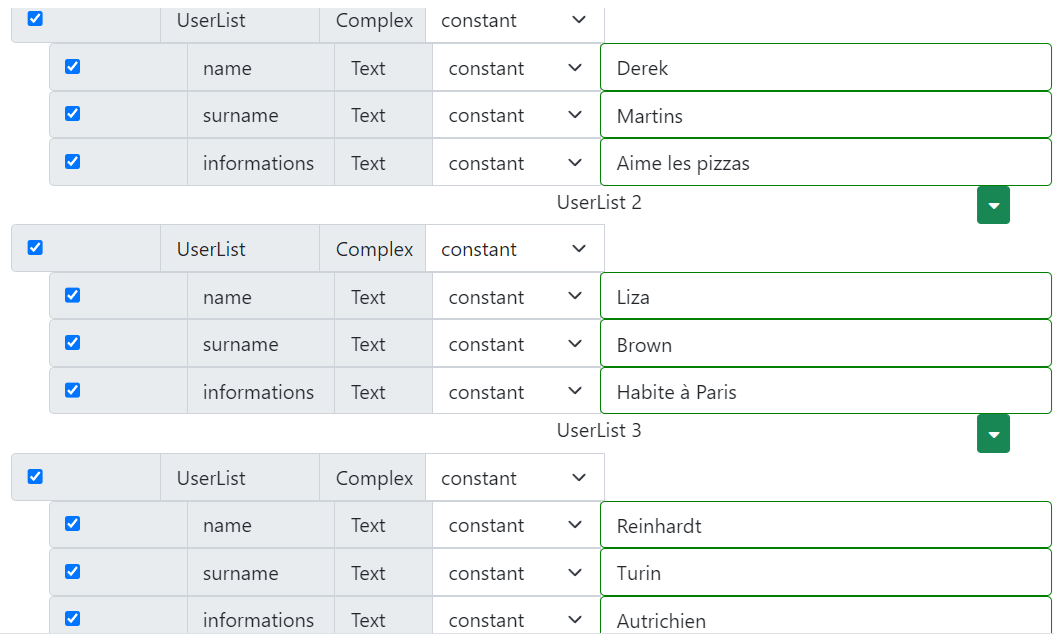
Check the lines list and UserList. For UserList, choose the number of members you desire by selecting the field and using the Up or Down arrow keys of the keyboard to increment or decrement the number of members (for this example we will say you chose three).

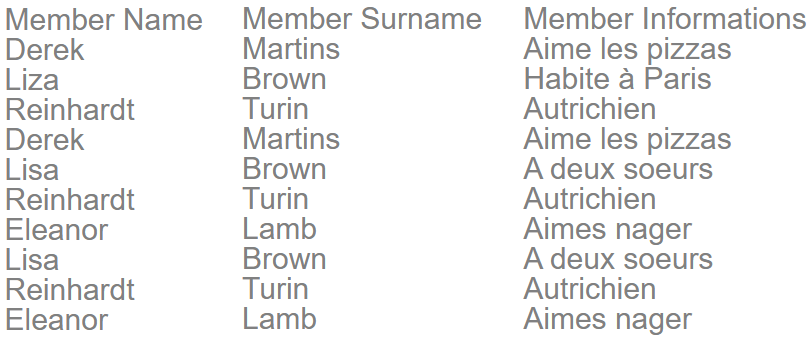
Fill the lines of list as you wish, the picture bellow in an example:
Click on the button Save.
For the second TimelineAction, add a mapping for the flow "add_new_member_to_list", create a new name, surname, and the information of this new member.
For the third TimelineAction, add a mapping for the flow "modify_the_information", write in the cases targetname and targetsurname, the name and surname corresponding to the member you wish to modify.
In modifname, modifsurname and modifinformation, write the information you want to replace the current ones with.

For the fourth TimelineAction, add a mapping for the flow "remove_member_to_list", write in the cases targetname and targetsurname the name and surname corresponding to the member you wish to remove.

HMI context
We will now do the mapping for the flow "request_information_about_members", go to the HMI context and drag&drop the Button element (change its parameter buttonLabel to Search Information), open its Mapping page and add a simu to model mapping element for the flow "request_information_about_members" and select the event Released before clicking on the button Ok.

Drag&Drop three Text elements, change their names to "Member Name", "Member Surname" and "Member Information".
For the first one, open its Mapping page and add a Model to simu mapping element, then select the flow "give_information".
Check the button for the trigger "Add new line" and the "Param" Text line under it.
Change constant to variable, click on the "Choose variable" button and select the flow parameter "member_name". Click on Ok, then Save.

For the second and third Text element, create two more mappings for the same flow "give_information" with the same trigger, but select "member_surname" and "member_information" instead.
Run your scenario
Once every step was followed, pass in Run mode.
Clicking on the Button element will result in the following images:
After the first Timeline action:

After the second Timeline action:

After the fourth Timeline action:
