Add a cruise control feature to a car model
PRESENTATION
This tutorial has to be done from the Include a matlab activity in a model: Emergency Braking.
Prerequisites
Import the following model: File -> New -> Example -> Sim4Sys Model Examples -> Sim4Sys - Automotive.
Select Tutorial6.
News skills that you will acquire
On Designer:
- Add a performance to an internal activity,
- Concept on Interservice,
- Generate a document.
On Virtual Bench:
- Use a new Context elements: Toggle button, Slider range input, Number, Picto, Curve graph, Button.
Duration
4h
INTRODUCTION
In this tutorial we're going to design a Cruise control system. The cruise control system allows the car to maintain a cruising speed. When the user makes a speed request, we want the car to automatically increase or decrease the throttle to reach the defined speed. The service SpeedManagement will handle the action on the throttle depending on the request taken. With the implementation of such a system we want to be able to:
- Enable/Disable the cruise control.
- Pause/Resume the cruise control.
- Get a speed request from the user.
- Determine if the car needs to accelerate or brake.
- Accelerate or brake accordingly.
- Maintain a steady speed.
Similarly to the Include a matlab activity in a model tutorial, we will have interService interactions. A new service called CruiseControl will take the user request, process it, and pass the information to the SpeedManagement service which will accelerate or brake in order to maintain a cruising speed.
CREATE NEW SERVICE AND USE CASES
First, we need to create a new service called CruiseControl.
- Open the Car structure diagram.
- Drag & drop a new service in the car structure. Name it CruiseControl.
- Click on the new service, then in the Relevant Phase Diagram add a New Life Phase: Standard Use
The next step is to create all the use cases for our cruise control service:
-
Go to the UCD diagram.
-
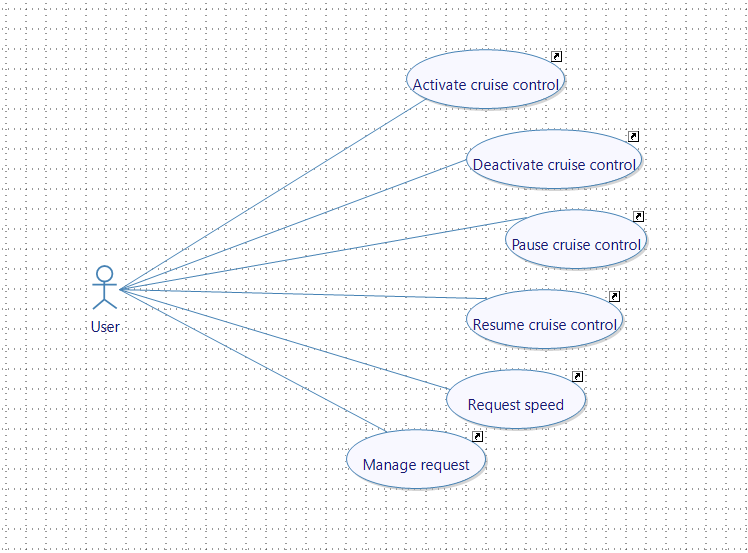
Create the following cases:
- Activate cruise control.
- Deactivate cruise control.
- Pause cruise control.
- Resume cruise control.
- Request speed.
- Manage request.
-
Add a new actor named user and associate it with the use cases previously created.
We are now going to add user stories to each use case we created.
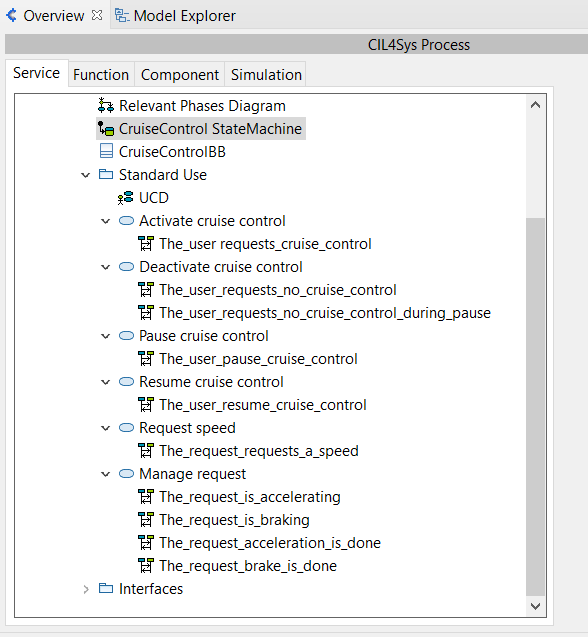
Create the following User story:
- Activate cruise control
- The_user_requests_cruise_control.
- Deactivate cruise control
- The_user_requests_no_cruise_control.
- The_user_requests_no_cruise_control_during_pause.
- Pause cruise control
- The_user_pause_cruise_control.
- Resume cruise control
- The_user_resume_cruise_control.
- Request speed
- The_user_requests_a_speed.
- Manage request
- The_request_is_accelerating.
- The_request_is_braking.
- The_request_acceleration_is_done.
- The_request_brake_is_done.
CREATE NEW TYPE
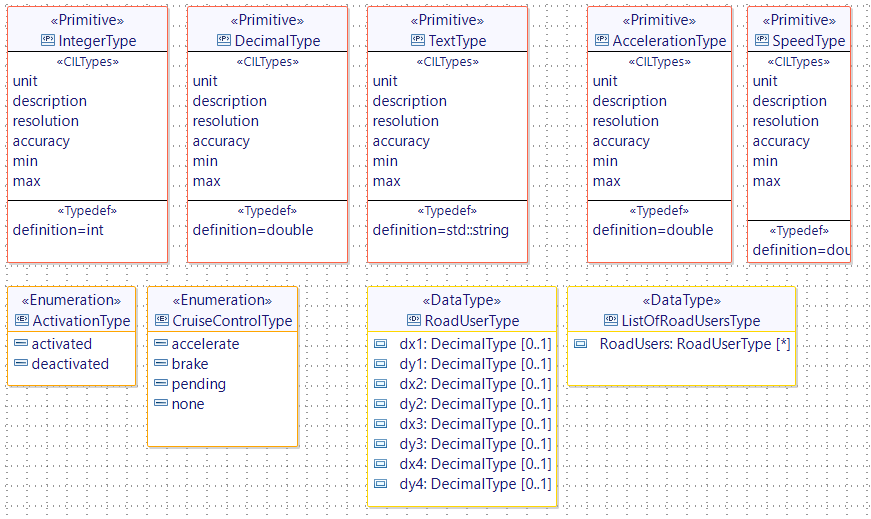
We need to create a new type to handle the cruise control state.
Add a new enumeration CruiseControlType and drag & drop 4 new literals:
- accelerate.
- brake.
- pending.
- none.
CREATE NEW STATE
The Cruise control service can have 4 different states depending on its usage:
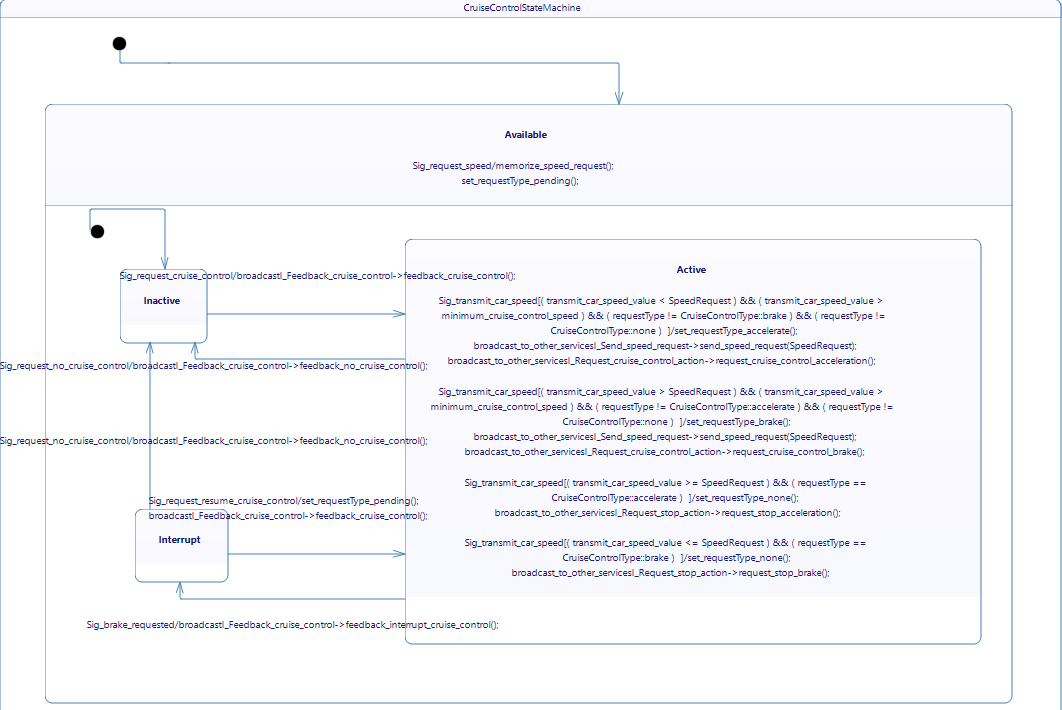
- Available: a composite state representing the availability of the Cruise Control Service.
- Inactive: the cruise control is not engaged.
- Active: the cruise control is engaged and controls the vehicle's speed.
- Interrupt: an interrupt state, likely for situations where the cruise control is temporarily disengaged (such as during manual braking).
Following the car model, we can have different types of cruise control. In this tutorial we will implement a cruise control that can memorize speed requests even if it's not turned on. Hence the Available state: it will listen to the user request whether it is turned on or off.
In this Available state, we have 3 sub-states:
- Inactive: the user has turned the cruise control off.
- Active: the user has turned the cruise control on .
- Interrupt: the user paused the cruise control by pressing the brakes.
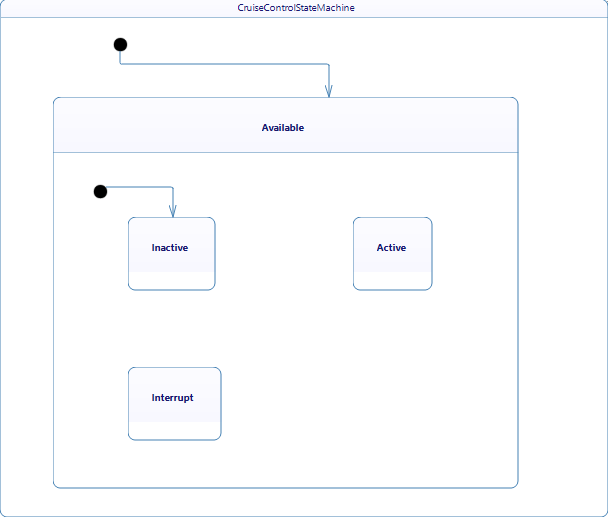
Our state structure will look like this:
- Available
- Inactive.
- Active.
- Interrupt.
To create this, go to the CruiseControl state machine:
- Rename FirstState to Available.
- Add a new Inactive state inside the Available state.
- Add an initial point inside the Available state.
- Trace a transition between the initial point and the state Inactive.
- Add a new Active state inside the Available state.
- Add a new Interrupt state inside the Available state.
Your CruiseControl state machine should now look like this:
CREATE NEW FLOWS AND INTERFACES
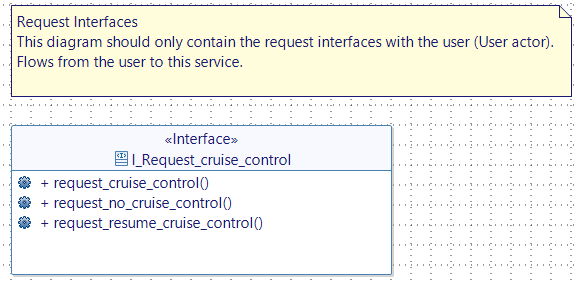
Request Interfaces
- Open Requested Interfaces diagram of the CruiseControl service.
- Drop a new interface "I_Request_cruise_control".
- Add the following flows:
- request_cruise_control.
- request_no_cruise_control.
- request_resume_cruise_control.
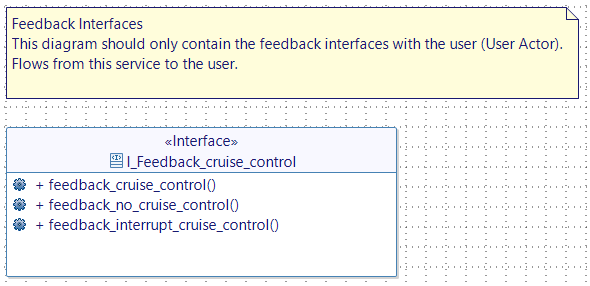
Feedback Interfaces
- Open the feedback interfaces diagram.
- Drop a new interface "I_Feedback_cruise_control".
- Add the following flows:
- feedback_cruise_control.
- feedback_no_cruise_control.
- feedback_interrupt_cruise_control.
USER STORY
Activate cruise control
The_user_requests_cruise_control
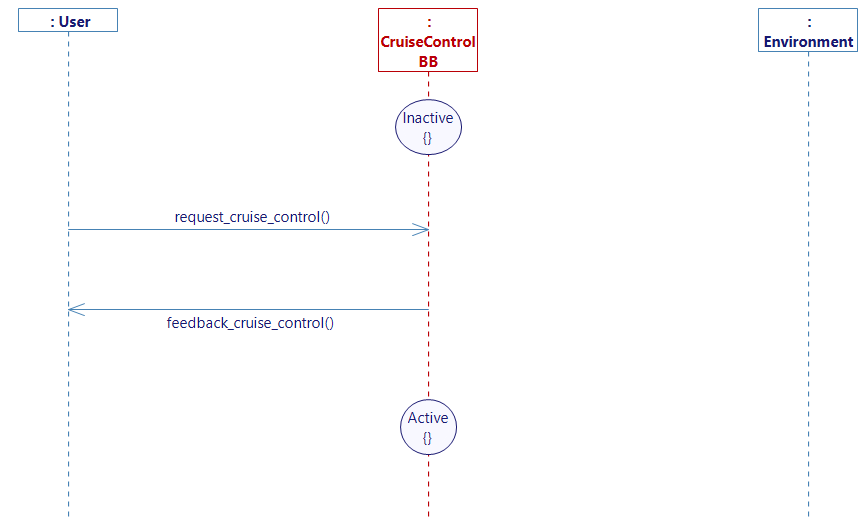
- Go to the user story The_user_requests_cruise_control
- Drop a new state on the service Lifeline and select Inactive.
- Complete the user story with a flow request_cruise_control from the User to CruiseControlBB. And another flow feedback_cruise_control from the service to the User.
- Drop a state Active at the end of the Lifeline to switch the state from inactive to active when the request flow is received.
- Generate the state machine.
Deactivate cruise control
The_user_requests_no_cruise_control
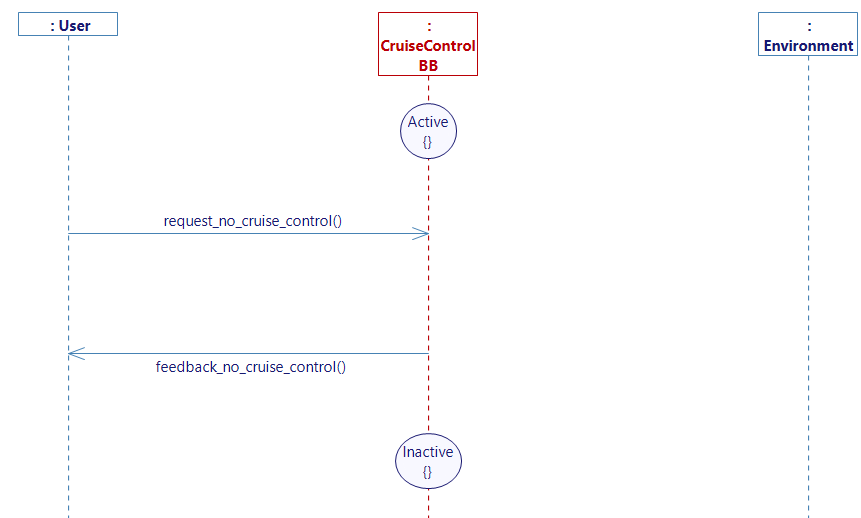
- Go to the user story The_user_requests_no_cruise_control
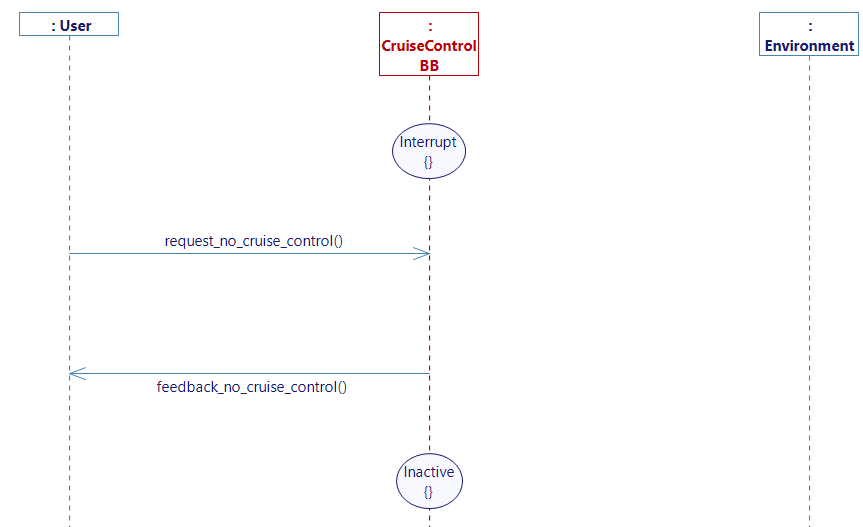
This diagram will be similar to the one we created to activate the cruise control. The cruise control service is in an Active state, upon the reception of the flow "request_no_cruise_control" a feedback "feedback_no_cruise_control" is sent to the user and the state switches to Inactive.
Complete the diagram accordingly.
- Generate the state machine.
The_user_request_no_cruise_control_during_pause
- Go to the user story The_user_requests_no_cruise_control_during_pause.
When the user pauses the cruise control, it enters a state called interrupt. The diagram is the same as the The_user_requests_no_cruise_control diagram except that we switch from the state Interrupt to Inactive.
- Generate the state machine.
Request speed
The_user_requests_a_speed
- Go to _The_user_requests_a_speed_diagram
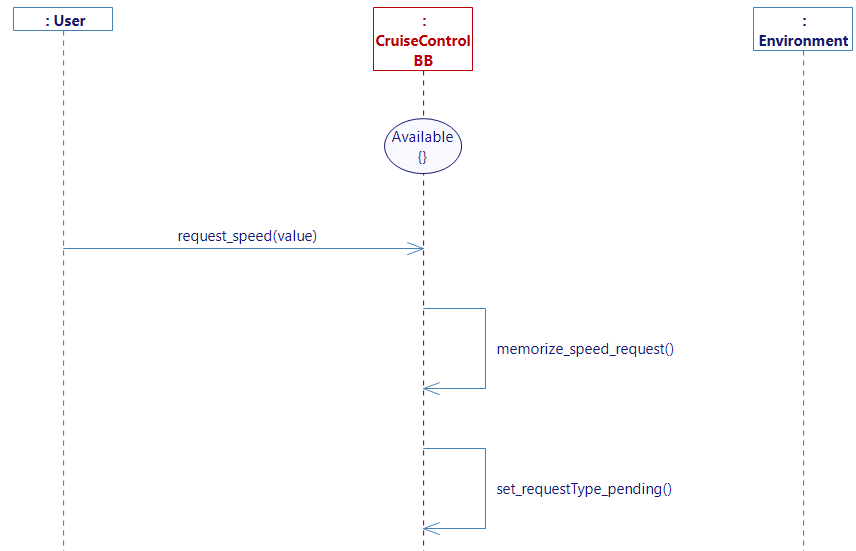
- Drop a state Available because we want to be able to memorize the speed request even if the cruise control is off.
- Trace a flow from the User to the service.
- Create a new flow.
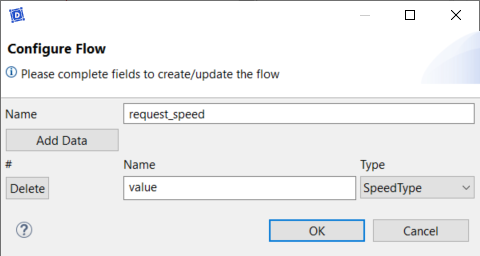
- Drop a new interface I_Request_speed with a flow request_speed with value as a SpeedType type.
- Go back to the diagram
- Add a flow from the User to the service and select request_speed for the flow.
- Create 2 internal activities memorize_speed_request and set_requestType_pending.
- Create 2 lifeline variables:
- a variable speedRequest with the type SpeedType and set the init value to
0.0. - a variable requestType of type CruiseControlType and set it to be "none" by default.
- a variable speedRequest with the type SpeedType and set the init value to
- Complete the internal activity memorize_speed_request with C++ code and add the following code:
speedRequest = request_speed_value; - Complete the activity set_requestType_pending, select Set Default Values and set requestType to "pending".
- Generate the state machine.
Manage request
In the last diagram, we memorized the user's speed request. Now, in this use case we will process this request and determine whether the car has increased the throttle or decreased it.
The_request_is_accelerating
- Go to The_request_is_accelerating diagram.
- Drop a new state on the service Lifeline and select Active.
- Add a new lifeline variable minimum_cruise_control_speed of type SpeedType and set the init value to
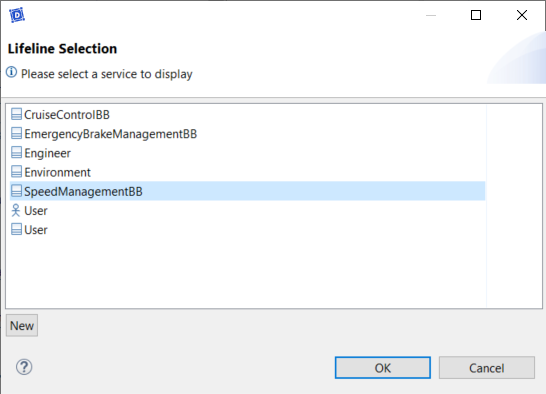
50.0. - Add a new lifeline.
- Select SpeedManagement and click OK.
- Drop a new state on the SpeedManagement Lifeline and select Active.
- Trace a flow from speedManagement to CruiseControl.
- Select the flow transmit_car_speed.
- Drag & drop the interface I_transmit_car_speed from the assistant view.
- Go back to the diagram.
- Create an internal activity setRequestType_accelerate and set the default value of requestType to accelerate.
- Create a new flow from CruiseControl to SpeedManagement:
- "I_Send_speed_request" with a flow "send_speed_request" with value as a type speedType.
- Go back to the diagram and add the flow you just created.
- Select SpeedRequest as the value for the flow.
- Don't forget to drag & drop the interface afterwards.
- Add a flow from CruiseControl to SpeedManagement.
- Create the following interface:

- Go back to the diagram and add the flow.
- Create a guard condition and use transmit_car_speed as the trigger:
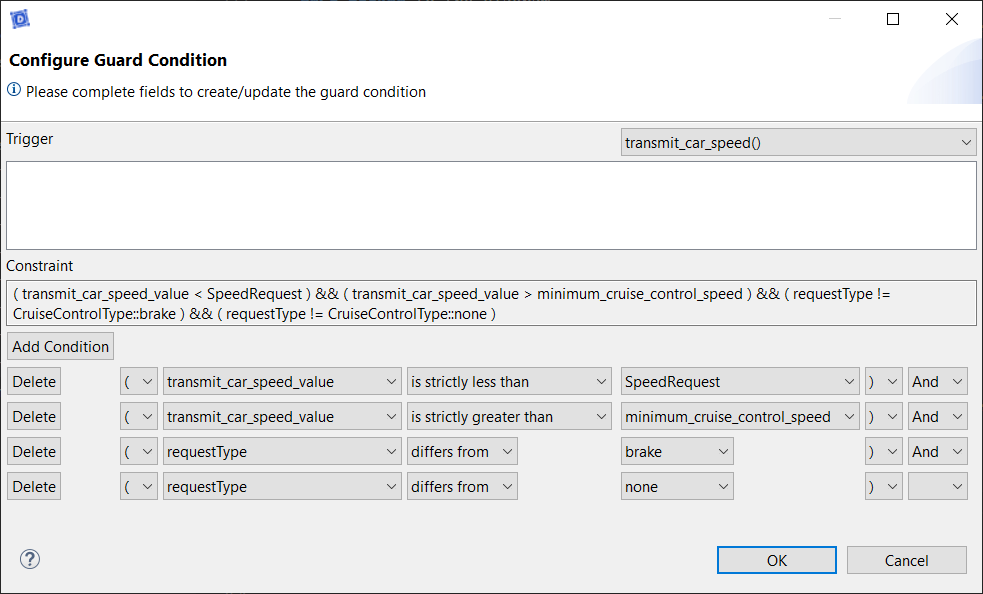
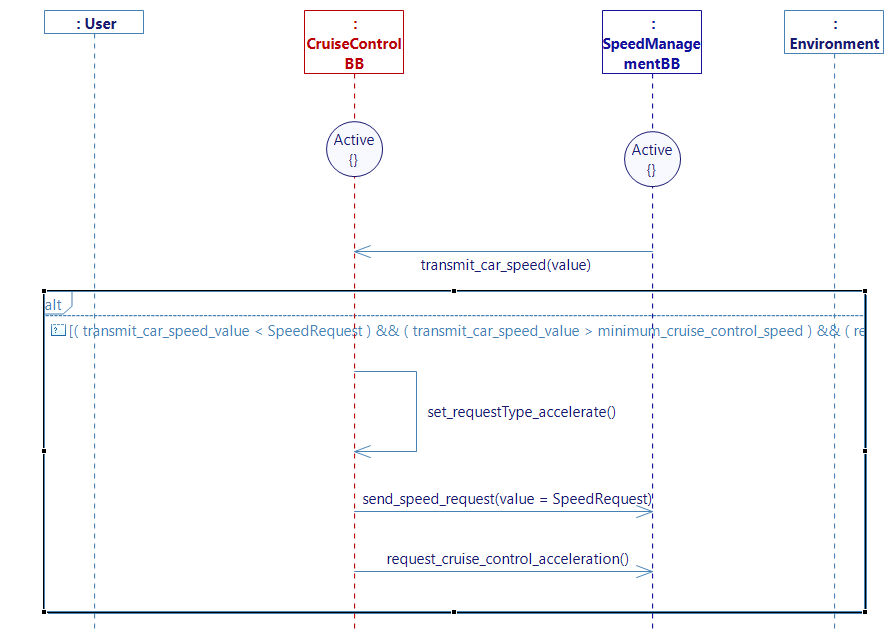
- Generate the state machine.
The_request_is braking
Similarly to the acceleration diagram,
- Go to The_request_is_braking diagram.
- Drop a new state on the service Lifeline and select the Active.
- Add the SpeedManagement lifeline.
- Drop a new state and select the Active on the SpeedManagement Lifeline.
- Trace a flow transmit_car_speed from SpeedManagement to CruiseControl.
- Create an internal activity set_RequestType_brake.
- Set the value of requestType to brake.
- Trace a flow send_speed_request from CruiseControl to SpeedManagement.
- Trace a flow request_cruise_control_brake from CruiseControl to SpeedManagement_.
- Add the following guard condition:
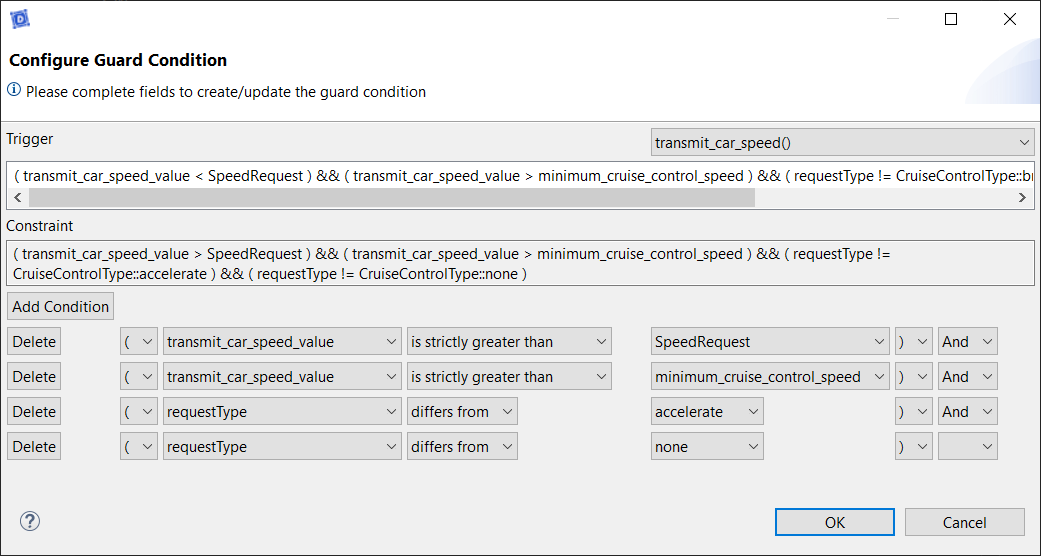
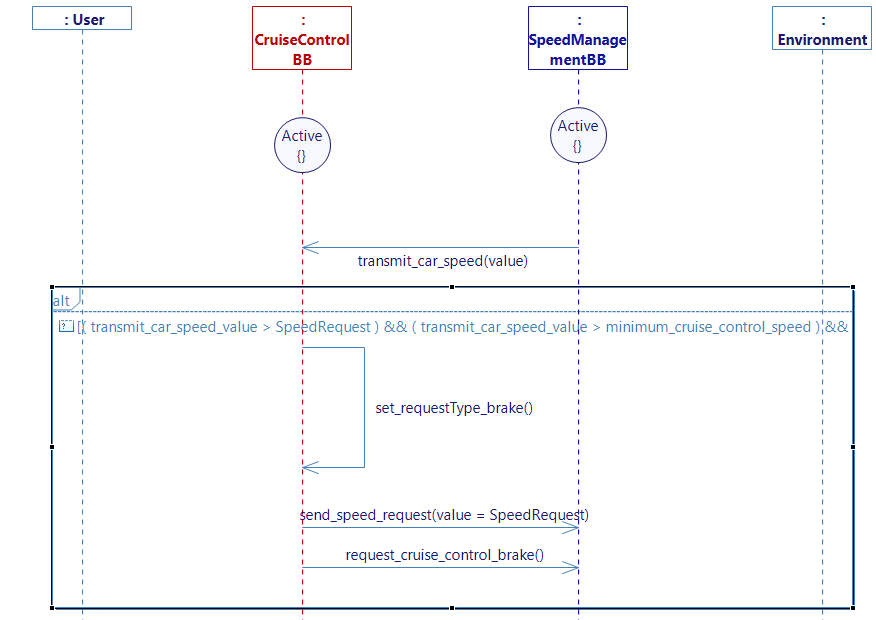
- Generate the state machine.
Now that the cruise control can tell the speed management service when to accelerate or brake following the request, we need the cruise control to tell when to stop the acceleration or brake.
The_request_acceleration_is_done
- Go to The_request_acceleration_is_done diagram.
- Drop a new state on the service Lifeline and select the Active.
- Add the SpeedManagement lifeline.
- Drop a new state and select the Active on the SpeedManagement Lifeline.
- Trace a flow transmit_car_speed from SpeedManagement to CruiseControl.
- Create an internal activity set_RequestType_none.
- Set the value of requestType to none.
- Trace a flow from CruiseControl to SpeedManagement.
- Create a new flow and add the interface I_Request_stop_action with the flows:
- request_stop_acceleration.
- request_stop_brake.
- Create a new flow and add the interface I_Request_stop_action with the flows:
- Go back to the diagram and add the flow.
- Add the following guard condition:
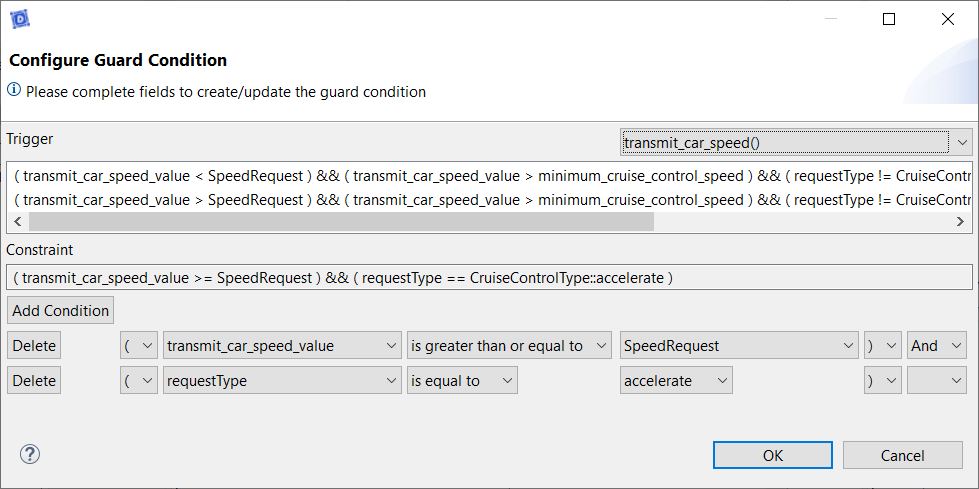
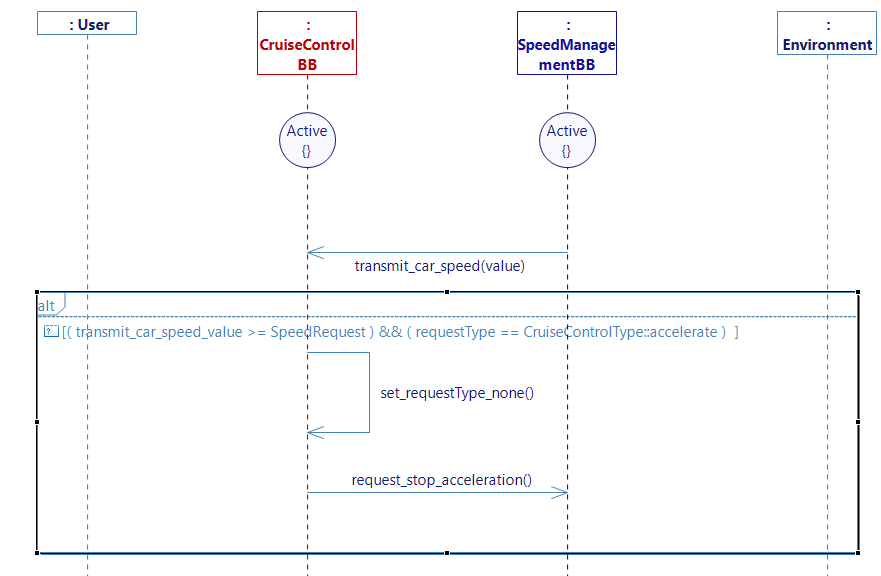
- Generate the state machine.
The_request_brake_is_done
- Go to The_request_brake_is_done diagram.
- Drop a new state on the service Lifeline and select the Active.
- Add the SpeedManagement lifeline.
- Drop a new state and select the Active on the SpeedManagement Lifeline.
- Trace a flow transmit_car_speed from SpeedManagement to CruiseControl.
- Add an internal activity set_RequestType_none.
- Trace a flow request_stop_brake from CruiseControl to SpeedManagement.
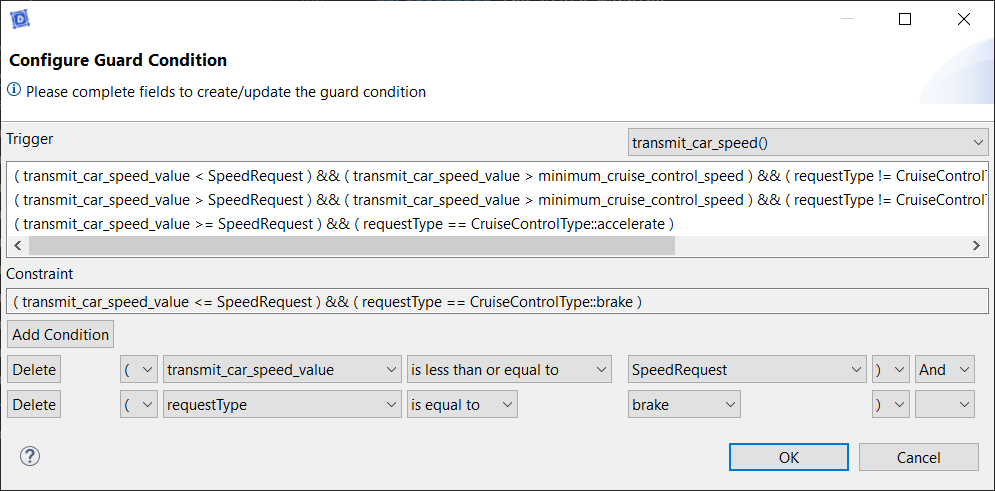
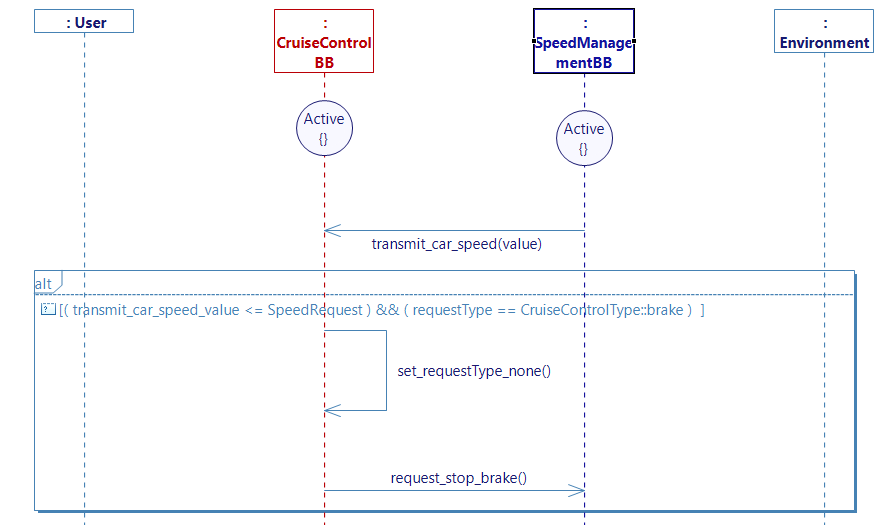
- Generate the state machine.
We now have to go to the service SpeedManagement to handle the received messages.
Accelerate
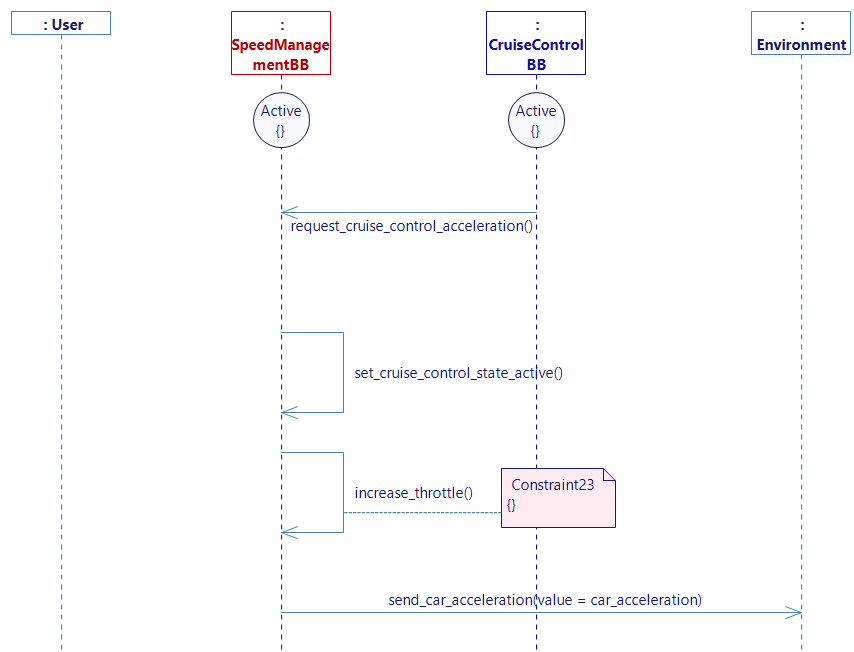
Cruise_control_acceleration_request_is_received
- Go to the service SpeedManagement.
- Create a new user story Cruise_control_acceleration_request_is_received in the Accelerate use case.
- Drop a new state and select the Active on the SpeedManagement Lifeline.
- Create a new lifeline variable CruiseControlState of type ActivationType and set the init value to deactivated.
- Add cruiseControl lifeline.
- Trace a flow request_cruise_control_acceleration from CruiseControl to SpeedManager.
- Create an internal activity set_cruise_control_state_active and set the default value CruiseControlState to activated.
- Create an internal activity increase_throttle.
- Complete the increase_throttle with the following C++ code:
float accelCoef;
float percentageGapSpeed;

percentageGapSpeed = (abs(float(send_speed_request_value - the_car_speed_is_received_value)) / ((send_speed_request_value + the_car_speed_is_received_value) / 2)) * 100;

if(percentageGapSpeed < 10 && percentageGapSpeed > 1)
	accelCoef = 1.2;
else if(percentageGapSpeed < 1)
	accelCoef = 0.65;
else if(percentageGapSpeed > 10)
	accelCoef = 1.5;

if(car_acceleration < 3 &&  percentageGapSpeed > 1)
	car_acceleration += 0.2 * accelCoef;
else if(percentageGapSpeed < 0.5 && car_acceleration < 1){
	accelCoef = 1.2;
	car_acceleration += 0.2 * accelCoef;
}
else if(percentageGapSpeed < 1)
	car_acceleration -= 0.15 * accelCoef;
This code will allow the car to accelerate depending on the speed request of the user. If the gap between the car speed and the requested speed is high, then the car will accelerate harder.
-
Drop a Performance on the diagram and choose the internal activity increase_throttle.
-
Add the following performance in the field New performance:
the acceleration intensity depending on the gap between send_speed_request_value and the_car_speed_is_received
-
Link the performance with the internal activity increase_throttle with a Performance Link.
-
Trace a flow send_car_acceleration from SpeedManagement to the environment.
- Generate the state machine.
Cruise_control_acceleration_is_done
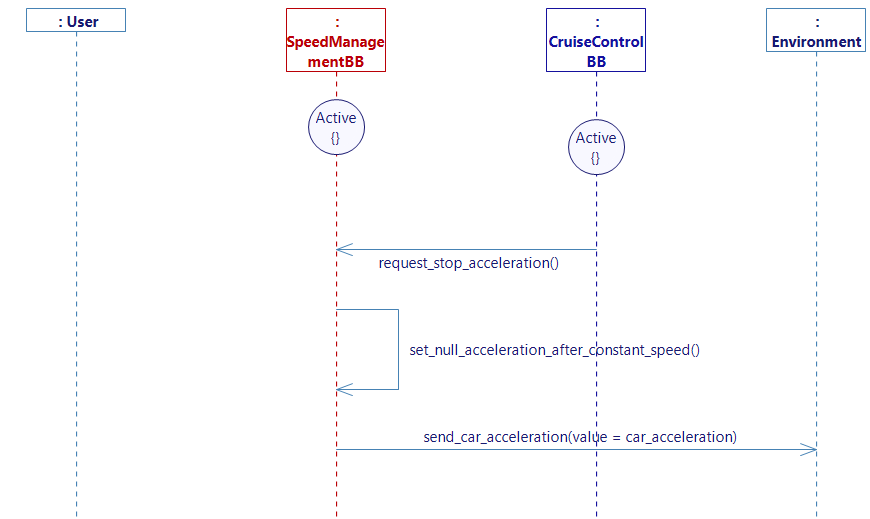
- Create a new user story Cruise_control_acceleration_is_done in Accelerate.
- Drop a new state on the service Lifeline and select the Active.
- Add a new CruiseControl lifeline.
- Drop a new state and select the Active on the CruiseControl Lifeline.
- Trace a flow request_stop_acceleration from CruiseControl to SpeedManager.
- Create an internal activity set_null_acceleration_after_constant_speed.
- Complete the activity with this code :
car_acceleration = 0.0;
- Complete the activity with this code :
- Trace a flow send_car_acceleration from SpeedManagement to the environment.
- Generate the state machine.
Brake
The_driver_brakes
- Go to the_driver_brakes diagram.
- Update the 2 guard conditions in this diagram with this condition:
CruiseControlState == ActivationType::deactivated.
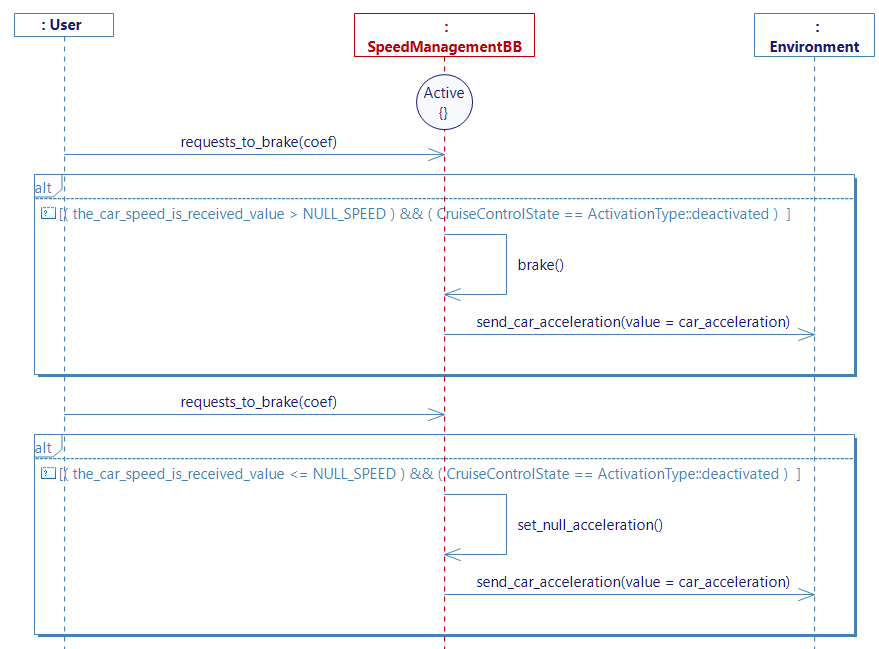
This will be useful for pausing the cruise control, as this diagram for braking and the diagram for braking to pause the cruise control (that we will complete later) are now independant thanks to the guard condition.
To sum up:
- If the driver brakes when the cruise control is off, then the flow will go through this diagram.
- If the driver brakes when the cruise control is on, this diagram will be ignored and the flow will go through the pause cruise control diagram.
Cruise_control_brake_is_received
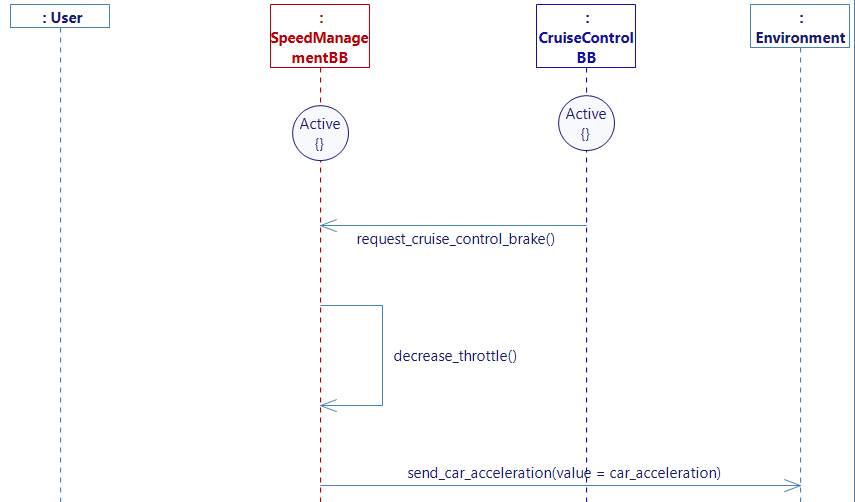
- Go in the Brake use case and create a new user story Cruise_control_brake_is_received.
- Drop a new state on the service Lifeline and select the Active.
- Add a new CruiseControl lifeline.
- Drop a new state and select the Active on the CruiseControl Lifeline.
- Trace a flow request_cruise_control_brake from CruiseControl to SpeedManagement.
- Create an internal activity decrease_throttle.
- Complete the activity with this code:
car_acceleration = -5;.
- Complete the activity with this code:
This time for the braking, we just affect to the car's acceleration a fixed value of -5. This shows you that you can either use a really simple implementation of the acceleration, or create a more complex algorithm for it like in the Cruise_control_acceleration_request_is_received diagram.
- Trace a flow send_car_acceleration from SpeedManagement to the environment.
- Generate the state machine.
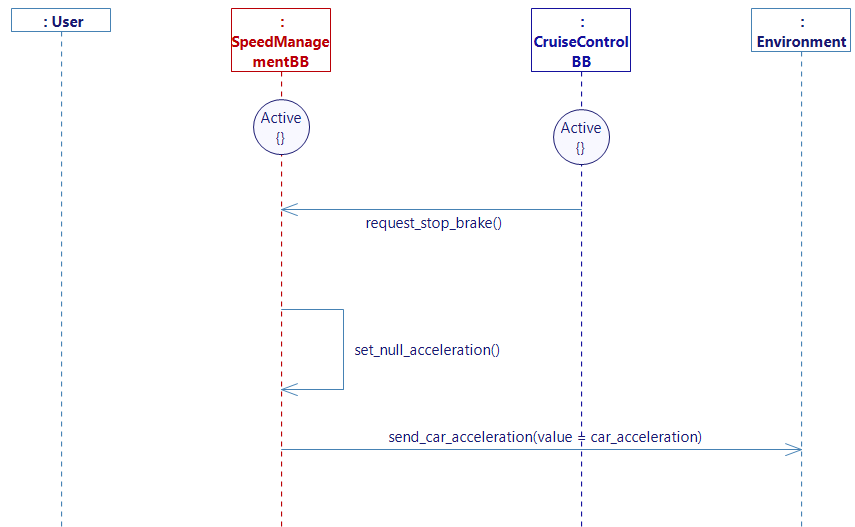
Cruise_control_brake_is_done
- Create a new user story Cruise_control_brake_is_done in Brake.
- Drop a new state on the service Lifeline and select the Active.
- Add a CruiseControl lifeline.
- Drop a new state and select the Active on the CruiseControl Lifeline.
- Trace a flow request_stop_brake from CruiseControl to SpeedManagement.
- Add an internal activty set_null_acceleration.
- Trace a flow send_car_acceleration from SpeedManagement to the environment.
- Generate the state machine.
We are done with the speed management part. We will now implement the possibility for the user to pause the cruise control.
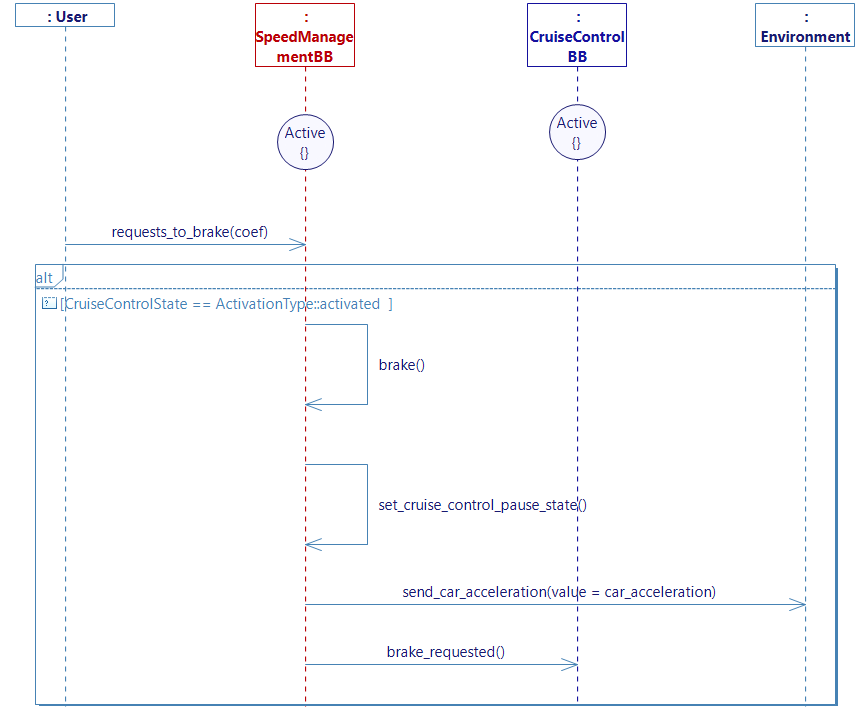
The_driver_requests_to_pause_cruise_control
- Create a new user story The_driver_requests_to_pause_cruise_control in Brake.
- Drop a new state on the service Lifeline and select the Active.
- Add the lifeline CruiseControl.
- Drop a new state and select the Active on the CruiseControl Lifeline.
- Trace a flow requests_to_brake from the User to SpeedManagement.
- Add an internal activity brake.
- Create an internal activity set_cruise_control_pause_state.
- Set the default value CruiseControlState to deactivated.
- Trace a flow send_car_acceleration from SpeedManagement to environment.
- Trace a new flow from SpeedManagement to CruiseControl.
- Create a new interface I_Brake_requested with the flow brake_requested.
- Go back to the diagram and add brake_requested.
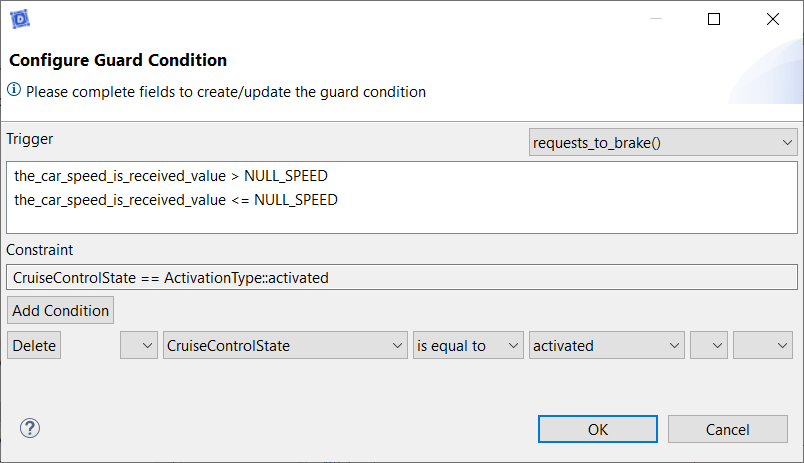
- Create a guard condition with request_to_brake as a trigger:
- Generate the state machine.
The next step is to process the brake request in the cruise control service.
Pause cruise control
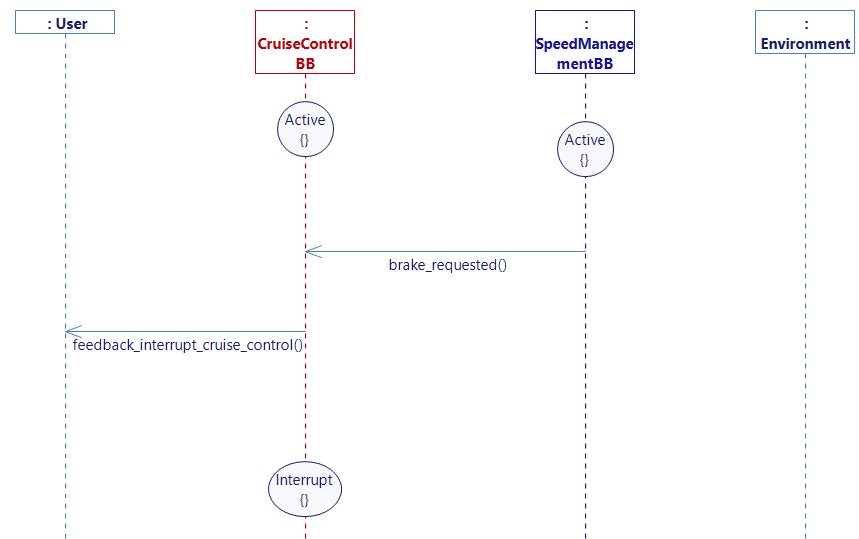
The_user_pauses_cruise_control
Head back to the CruiseControl service and go to the Pause cruise control use case and complete the user story The_user_pauses_cruise_control.
- Drop a new state on the service Lifeline and select the Active.
- Add a lifeline SpeedManagement.
- Drop a new state and select the Active on the SpeedManagement Lifeline.
- Trace a flow brake_requested from SpeedManagement to CruiseControl.
- Trace a flow feedback_interrupt_cruise_control from CruiseControl to _User.
- Add a state Interrupt to the CruiseControl lifeline.
- Generate the state machine.
Resume cruise control
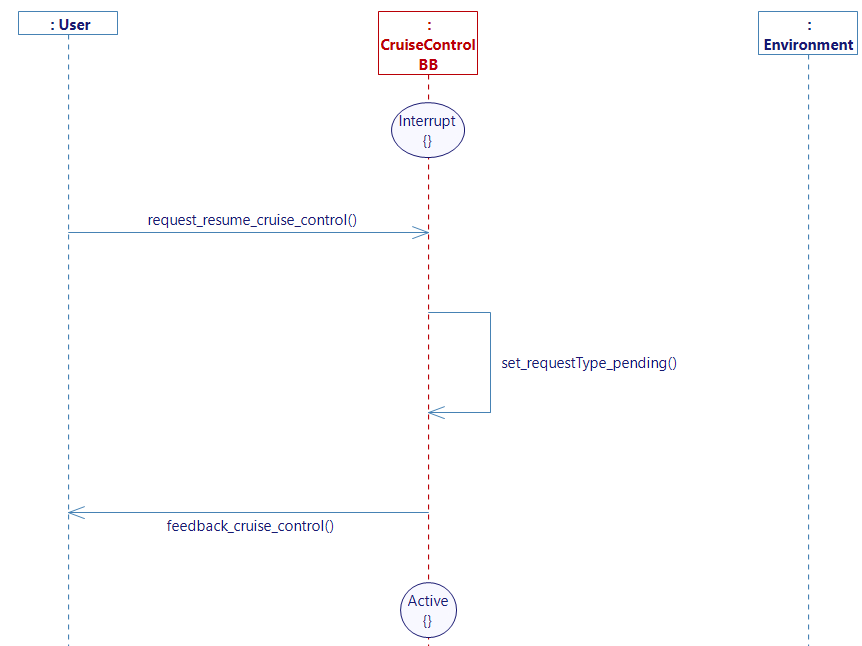
The_user_resumes_cruise_control
- Go to the Resume cruise control use case and complete the user story The_user_resumes_cruise_control.
- Add an Interrupt state.
- Trace a flow request_resume_cruise_control from User to CruiseControl.
- Add an internal activity set_requestType_pending.
- Trace a flow feeback_cruise_control from CruiseControl to User.
- Add a state Active.
- Generate the state machine.
STATE MACHINE
Your cruise control state machine should look like this (after rearranging it):
If you have the community version of Designer (free version), please build the executable via Hub4Sys as shown on this page.
You can now generate and build you project.
GENERATE REQUIREMENTS
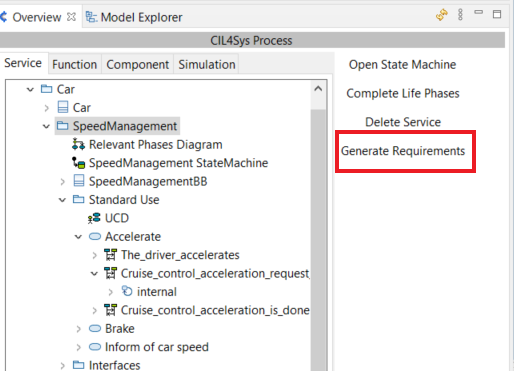
- Generate the requirements for each service:
- Select the service and click "Generate Requirements" on the right side.
- Choose the Generic Service Requirements Template and click OK.
- Repeat this process for each service.
GENERATE PROCESSING DOCUMENT
For a more detailed guide to generate a document from your model, see this link.
- Select your model in the Service tab in Overview.
- Update the document generation and select all.
Now head to the model explorer.
- Select your model package.
- Right click, New Document Template, DOCX - Standard Service Document.
It will open you this window:

- Right click on Text_Document_Template and Generate all(structure + Docx).
Once the generation is completed, you can find the documents in the Project Explorer > your model > output.
VISUALIZATION MAPPING
-
Go on the Sim4Sys Virtual Bench: https://sim4sys.com/.
-
Create a new scenario, executable and websocket (if needed, you can follow the detailed steps from the Mapping part of Start to use Sim4Sys with a simple model (blackbox), to create a new scenario).
-
Update the XML file for the executable that you will use (see this paragraph)
-
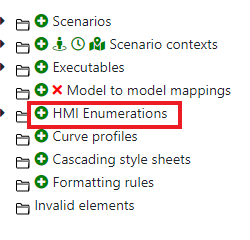
Create a new HMI enumeration with the literals:
- Off
- On
- Interrupted
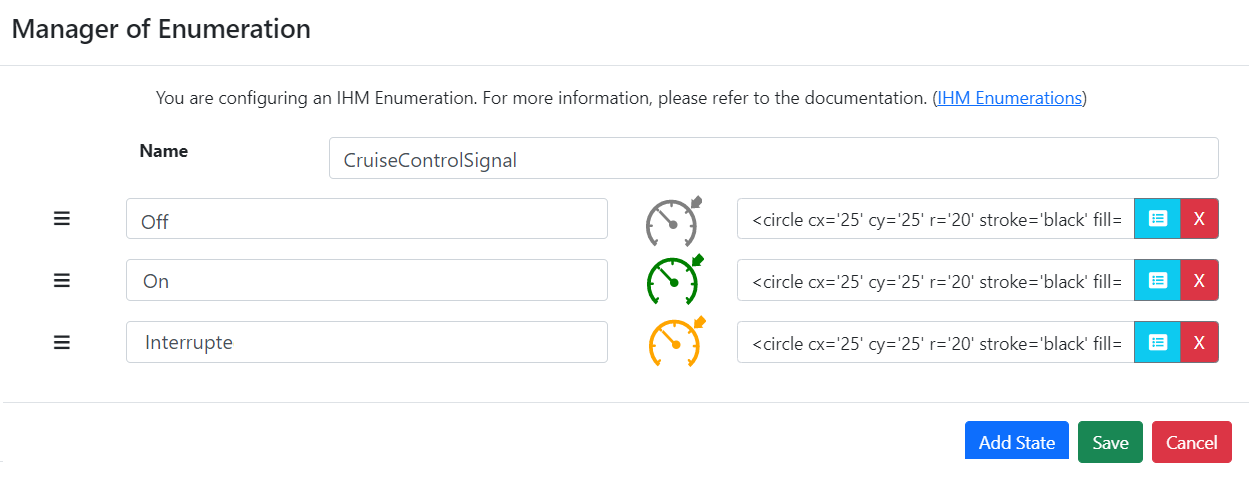
For the visualization we will need 3 scenario context:
- HMI (HMI context).
- Monitoring (HMI context).
- scene2D (scene context).
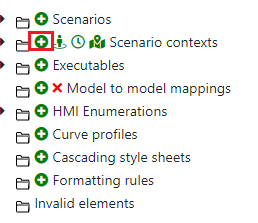
Create the 2 HMI scenario "HMI" and "Monitoring" by clicking the "+" next to Scenario contexts.

HMI context
-
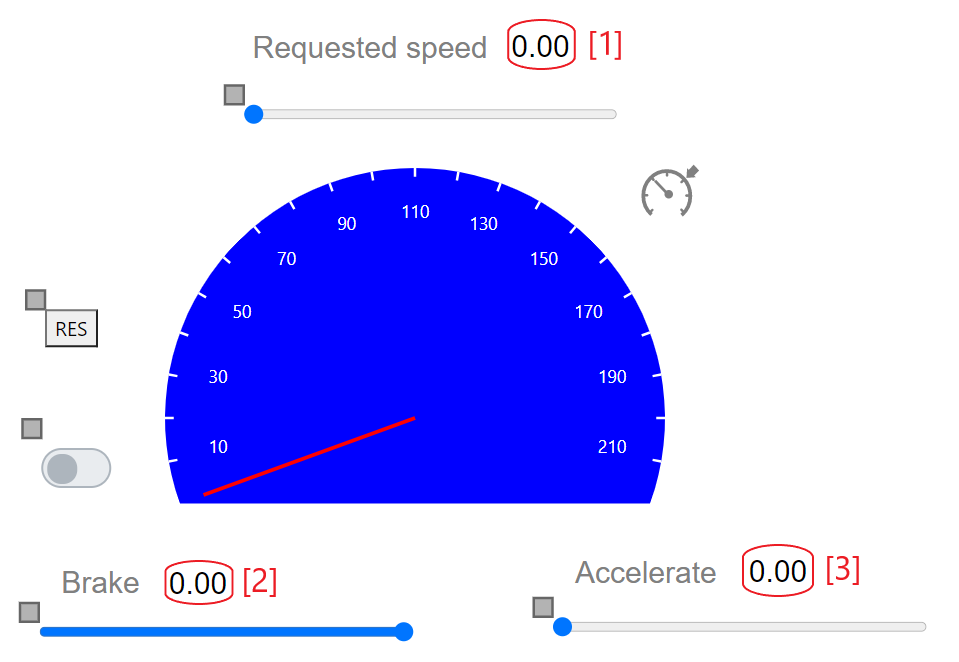
Go to the HMI context and add the following elements:
-
Add 3 sliders (add text on top of them to describe the slider's action)
- Slider 1: requested speed
- Change the fields minimal value to
50and the maximal value to220. - Add a text object above, name it "Requested speed"
- Add a number object next to the text.
- Change the fields minimal value to
- Slider 2: brake
- Change the fields minimal value to
-5and the maximal value to0. - Add a text object above, name it "Brake"
- Add a number object next to the text.
- Change the fields minimal value to
- Slider 3: accelerate
- Change the fields minimal value to
0and the maximal value to5. - Add a text object above, name it "Accelerate"
- Add a number object next to the text.
- Change the fields minimal value to
- Slider 1: requested speed
-
Add a button (rename the label to "RES").
-
Add a toggle button (you can resize the object if it's too small).
-
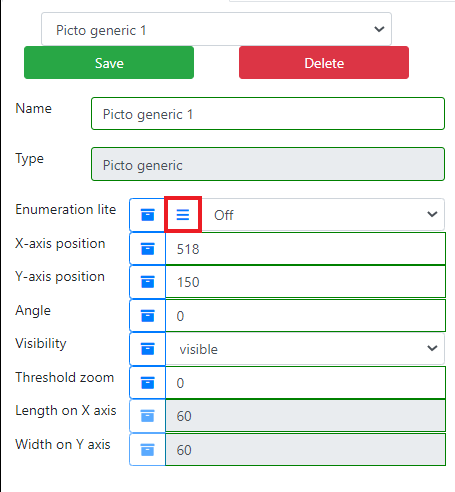
Add a picto generic element.
- Change the enumation lite field and select CruiseControlSignal. Set it to off
Your HMI context should now look like this:
Now we are going to map the signals to our HMI:
- Right Click on the requested speed slider.
- Simu to model mappings -> Create simu to model mapping.
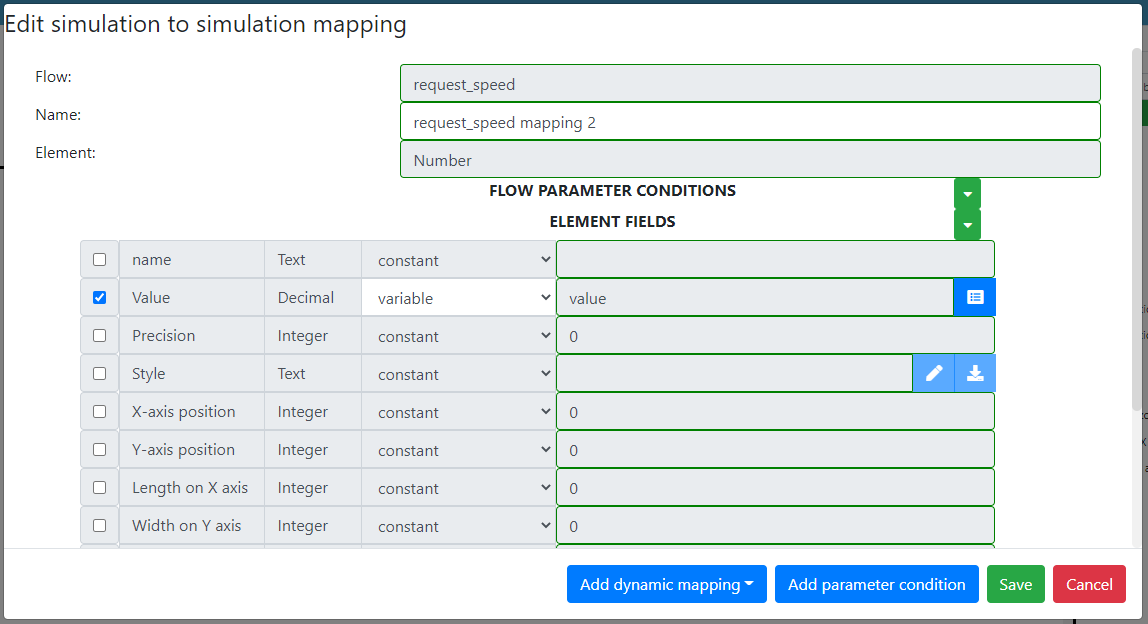
- Create a request_speed mapping.

- Right click on the number element next to requested speed ([1] in the HMI context image above).
- Create a simu to simu mapping with the flow request_speed.
- Right Click on the Brake slider
- Create a simu to model mapping with the flow requests_to_brake.
- Check the field, change from constant to variable then select Value.
- Right click on the number element next to Brake ([2] in the HMI context image above).
- Create a simu to simu mapping with the flow requests_to_brake.
- Check Value, change the field to variable and select coef.
- Right Click on the Accelerate slider
- Create a simu to model mapping with the flow _request_to_accelerate.
- Check the field, change from constant to variable then select Value.
- Right click on the number element next to Accelerate ([3] in the HMI context image above).
- Create a simu to simu mapping with the flow requests_to_accelerate.
- Check Value, change the field to variable and select coef.
- Right click on the RES button.
- Create a simu to model mapping with the flow request_resume_cruise_control with the event Pressed.
- Right click on the toggle button.
- Create 2 simu to model mapping:
- flow requests_no_cruise_control
- Event: unchecked.
- flow requests_cruise_control
- Event: checked.
- flow requests_no_cruise_control
- Right click on the picto generic.
- Create 3 model to simu mapping with the following flows:
- feedback_cruise_control
- Check enumeration literal and select the literal On.
- feedback_no_cruise_control
- Check enumeration literal and select the literal Off.
- feedback_interrupt_cruise_control
- enumeration literal and select the literal Interrupted.
- feedback_cruise_control
- Right click on the gauge.
- Create a model to simu mapping with the flow inform_of_car_speed.
- Check value, change to variable and select value.
Monitoring context
- Go to the Monitoring context.
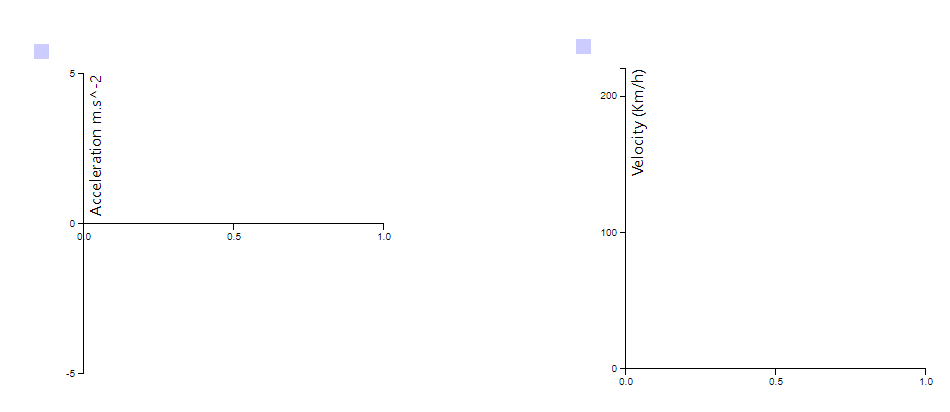
- Add 2 curve graph.
- Click on the first one.
- Change the unit to "Acceleration (m.s−2)"
- Change the Min vert. axis to
-5and the Max vert. axis to5. - Change the Max hori. axis to
1.0.
- Create a model to simu mapping to the acceleration graph with the flow send_car_acceleration.
- Click on the second one.
- Change the unit to "Velocity(Km/h)"
- Change the Max vert. axis to
220. - Change the Max hori. axis to
1.0.
- Create a model to simu mapping to the velocity graph with the flow inform of car speed.
Scene2D context
- Add a car element.
- Create a simu to model mapping for the car with the flow the_car_speed_is_received.
- Create a model to simu mapping for the car with the flow send_car_acceleration.
Run the visualization
Now the scenario is ready to play: you can connect the executable by clicking on the WebSocket button and click on play in Run mode.
Accelerate up to a speed greater than 50 Km/h with the slider. Then you can activate the cruise control with the toggle button. Choose a speed, the car should automatically get to that speed.
Try to brake when the cruise control is maintaining the car at a steady speed. The cruise control should be paused.
Finally press the resume button to resume the cruise control. The car will get to the memorized request.
An improvement to this model could be to implement a more optimized handling of the acceleration and braking. A PID controller could be added to the model to have a more smooth and precise acceleration and braking of the car.
GO FURTHER
You can try to add a PID controller in your model.